18 May
No matter what type of products you sell (sample libraries, plugins, soundsets etc.) as you grow your music software company, you want to ensure you’re getting the best return for your advertising spend on the platforms you’re advertising on (ROI – Return on Investment). However, there are so many different places you can spend your money, where is the best?
There’s no simple answer to this as it depends entirely on who your potential audience is and where they are located. For example, generally speaking KVR Audio is popular for the discussion of FX plugins and synths, whereas Vi-Control would be more popular for the discussion of orchestral sample libraries – but that doesn’t mean you should only advertise on one of those forums. You need to test out multiple avenues and see which brings you the best ROI in the long run and then focus your marketing efforts there. But how do you know where is bringing you in the best return on your dollars?
There are plenty of ways to track conversions from external websites, but the simplest (and cheapest) one which you can use with any CMS (eg. WooCommerce, Shopify, Squarespace etc.) is Google Analytics.
Here is a complete guide on how to track conversions from any external website or media, including banners ads, Youtube videos, affiliates etc. using Google Analytics.
Step 1: Setup a Google Analytics account.
- Go to http://www.google.com/analytics and sign up or login.
- Create a “Property” (https://support.google.com/analytics/answer/10269537) and get your website tracking code
Step 2: Add your Google Analytics Tracking Code to your Site
Add your tracking code to your website before the <head> tag on your website. You can do this in one of two ways:
- Manually add the code to your website by editing all of your website pages and adding the code from
<!-- Global Site Tag (gtag.js) - Google Analytics -->to</script>into anywhere before the<head>tag starts on your pages - Use a plugin that handles the code automatically for you. For example if you’re using WordPress/WooCommerce, you can use any of these plugins which will automatically add the code to all of your pages for you:
Google Site Kit: https://wordpress.org/plugins/google-site-kit/
Pixel Your Site: https://wordpress.org/plugins/pixelyoursite (note: this also lets you add Facebook conversion pixels and more)
Tip: If you’re using WordPress, you can alternatively just edit your header.php file and add the analytics code in there before the <head> tag and it will add the code to all of your pages. You can do this by going to Appearance -> Theme Editor -> Header.php
Step 3: Setup Conversion as a Goal
In Google Analytics, you need to setup a purchase (“conversion”) as a “Goal”. This lets you track how many people arrive on your website and make a purchase, which you can then filter to see how many people came from X website / X banner and made a purchase.
- (If you have already enabled goals, ignore this step and click “Admin” and “Goals” instead) In Google Analytics, click on “Conversions“, then “Goals” and “Setup Goals“
- Click “New Goal” and select “Custom“
- Enter a goal description (eg. “Purchase”)
- Select “Destination” as the Type and enter the URL for your “Thank you” page. This is the page the customer is redirected to after they complete a purchase on your website
- Press “Save” and enable recording
So far you will have created your Google Analytics account, added the code to your website and setup your conversion goals on your website. Now as you start to make sales, you will be able to see them in your analytics account by going to Acquisition > Overview and selecting your goal under the Conversion dropdown menu. You will see the channels where conversions are coming from (direct, social media etc.) but it won’t give you enough detail to make informed decisions for where to place your advertising budget. So next you need to setup a custom URL so you can track conversions specifically from that URL. This will allow you to track conversions from any link anywhere.
Step 4: Create a Campaign URL using Google URL Builder
Go to https://ga-dev-tools.appspot.com/campaign-url-builder and enter the information into the form to generate a unique URL you can use to track conversions from.
For example, if you are going to setup a banner advert on Vi-Control and want to track conversions from that particular banner, you might setup the campaign URL like this:
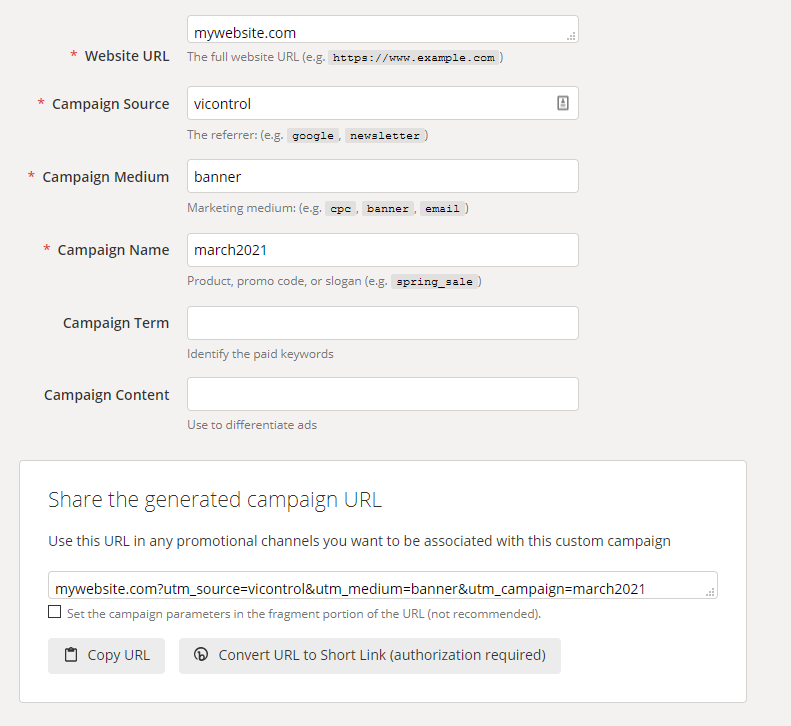
Your unique URL would then be http://www.mywebsite.com?utm_source=vicontrol&utm_medium=banner&utm_campaign=march2021 and you would ensure the banner uses that link when a person clicks on it.
Then you need to track the conversions that come from that link to see how many sales you’ve made from it (and others) so you can make a better informed decision on where to focus your advertising spend.
Step 5: Track Conversions from Custom URL
- In Google Analytics go to Acquisition > Campaigns > All Campaigns
- If you have clicks from your banner advert, you will find the campaign you created (eg. “march2021”) listed in the table along with the number of conversions (sales) from that particular campaign (ie. banner)
This process can also be used for tracking links from affiliates, Youtube videos, forum posts, marketing emails and much more.
Over time, it will show you where you are getting the best return for your marketing spend, allowing you to use your budget more effectively as you progress.
Of course, don’t forget to check out the Pulse Downloader app to improve your download process for customers too – its very low cost and affordable with lots of useful features:
https://pulsedownloader.com/for-developers


